
Oh my goodness, let me tell you about the sheer joy of making Crispy Pan-Fried Chicken Dumplings! There’s something absolutely magical about the moment you take that first bite and the crispy exterior gives way to a savory, juicy filling. The combination of tender chicken, fresh vegetables, and a hint of soy sauce is just perfection. It’s a symphony of flavors that dance together in your mouth, and trust me, you’ll never want to go back to store-bought dumplings after trying these!
This recipe holds a special place in my heart. I remember the first time I made these dumplings with my grandmother. We spent an entire afternoon in the kitchen, laughing and sharing stories as we wrapped those little pockets of goodness. She taught me the importance of getting the filling just right and how to fold them perfectly, so they wouldn’t burst open while cooking. Now, every time I whip up a batch, it feels like I’m carrying on that sweet tradition. So, gather your ingredients, and let’s create some delicious memories together with these crispy delights!
Ingredients List
To make the most delicious Crispy Pan-Fried Chicken Dumplings, you’ll need the following ingredients. Trust me, each one plays a vital role in achieving that perfect flavor and texture!
- For the Dumpling Filling:
- 1 pound ground chicken
- 1 cup finely chopped cabbage
- 1/2 cup diced carrots
- 1/4 cup chopped green onions
- 2 cloves garlic, minced
- 1 tablespoon soy sauce
- 1 teaspoon sesame oil
- 1/2 teaspoon ground ginger
- Salt and pepper, to taste
- For the Dumpling Wrappers:
- 1 package of round dumpling wrappers (about 30 pieces)
- For Cooking:
- 2 tablespoons vegetable oil
- 1/2 cup water (for steaming)
Make sure you have everything on hand before you start! Each ingredient contributes to the overall yumminess of these dumplings. Now, let’s get cooking!
How to Prepare Crispy Pan-Fried Chicken Dumplings
Alright, let’s dive into the process of making these mouthwatering Crispy Pan-Fried Chicken Dumplings! Don’t worry; I’ll guide you through every step, and before you know it, you’ll have a plate full of crispy goodness that you can’t wait to share. Here’s how to do it!
Making the Filling
First things first, we need to whip up that delicious filling! In a large mixing bowl, combine the ground chicken, finely chopped cabbage, diced carrots, and chopped green onions. Oh, the colors in that bowl are just gorgeous! Then, toss in the minced garlic, soy sauce, sesame oil, ground ginger, and season with salt and pepper to taste. I always say, taste as you go! This is your chance to make it *just right* for you.
Now, here’s a little tip: use your hands to mix everything together. It might get a bit messy, but trust me, it’s the best way to ensure everything is evenly combined. Just make sure your hands are clean, of course! Once everything is mixed thoroughly, set that bowl aside and let the flavors mingle while you prepare the wrappers.
Assembling the Dumplings
Now comes the fun part—assembling the dumplings! Take one dumpling wrapper and place it in the palm of your hand. Spoon about a tablespoon of the filling into the center. Don’t overfill them, or they’ll burst while cooking! Wet the edges of the wrapper with a little water using your fingertip; this helps seal the dumpling.
Fold the wrapper in half to create a half-moon shape, and press the edges together firmly to seal. I love to pinch the edges with my fingers to make little pleats—it adds a nice touch and helps keep the filling secure inside. If you’re feeling adventurous, you can also try the traditional pleating technique, which looks super fancy!
Repeat this process until you’ve filled all your wrappers. If you have any leftover filling, you can always make a few more dumplings or use it in stir-fry later. Just keep your assembled dumplings covered with a damp cloth to prevent them from drying out while you work.
Cooking the Dumplings
Now for the grand finale! Heat up a large skillet over medium-high heat and add the vegetable oil. You want enough oil to coat the bottom of the pan—this is what gives your dumplings that crispy texture! Once the oil is shimmering, carefully place the dumplings in the pan, making sure they aren’t overcrowded. You may need to do this in batches.
Cook them for about 2-3 minutes until the bottoms are golden brown and crispy. Then, carefully pour in 1/2 cup of water around the dumplings (don’t pour it directly on top of them) and quickly cover the skillet with a lid. This will steam the dumplings and cook the chicken through. Let them steam for about 5-7 minutes.
Once the water has evaporated, remove the lid and let them cook for an additional minute or so to regain that crispy bottom. Use a spatula to carefully lift them out of the pan and onto a plate. And there you have it—beautifully crispy, pan-fried chicken dumplings that are just begging to be devoured!
Tips for Success with Crispy Pan-Fried Chicken Dumplings
Getting the perfect Crispy Pan-Fried Chicken Dumplings can be a delightful challenge, but I’ve got some tips to help you succeed every time! Trust me; these little nuggets of joy deserve all the care you can give them.
Use Fresh Ingredients
When it comes to the filling, the fresher the ingredients, the better the flavor! Opt for fresh ground chicken instead of pre-packaged. If you can, chop your vegetables just before mixing them in; this keeps them crisp and vibrant, ensuring that every bite bursts with freshness.
Don’t Overfill Your Dumplings
It’s tempting to pack in as much filling as possible, but resist that urge! Overfilling can lead to leaks and a mess in the pan. Aim for about a tablespoon of filling per dumpling; it’s the sweet spot that keeps them intact while cooking.
Master the Sealing Technique
Sealing your dumplings properly is crucial. Use a bit of water on the edges to help them stick together, and be sure to press firmly. If you’re worried about leaks, you can even do a double seal by pinching the edges a second time. This extra step can save you from a filling disaster!
Adjust Cooking Time Based on Size
Keep in mind that cooking times can vary depending on how big or small you make your dumplings. If you’ve got larger ones, they might need an extra minute or two to cook through. Just keep an eye on them and do the touch test: they should feel firm and not squishy!
Experiment with Dipping Sauces
Don’t forget about the dipping sauces! A simple mix of soy sauce and rice vinegar is always a hit, but you can jazz things up with some chili oil or sesame oil for extra flavor. Experimenting with different sauces can take your dumplings to another level!
Keep Them Warm
If you’re making a big batch, keep the cooked dumplings warm in an oven set to low heat while you finish cooking the rest. Just place them on a baking sheet lined with parchment paper so they don’t stick together.
With these tips in your back pocket, you’re well on your way to mastering the art of Crispy Pan-Fried Chicken Dumplings. Enjoy the process, and happy cooking!
Nutritional Information Section
Now, let’s talk about the nutritional side of these delightful Crispy Pan-Fried Chicken Dumplings! While I always believe in enjoying food without guilt, it’s nice to know what you’re putting into your body. Here’s an estimated breakdown per dumpling:
- Calories: 200
- Fat: 10g
- Saturated Fat: 3g
- Cholesterol: 25mg
- Sodium: 150mg
- Carbohydrates: 25g
- Fiber: 1g
- Protein: 3g
- Sugar: 0g
These values are estimates and can vary based on specific brands and the exact measurements you use. Remember, the joy of cooking and sharing these dumplings is about creating memories and flavors that you love. So go ahead, indulge a little! Enjoy your culinary adventure with these dumplings, and savor every bite!
FAQ Section
Got questions about making Crispy Pan-Fried Chicken Dumplings? No worries! I’ve got you covered with some of the most common queries I hear. Here’s what you need to know!
How do I store leftover dumplings?
If you happen to have any leftover dumplings (which is rare in my house!), let them cool completely before storing. Place them in an airtight container and keep them in the fridge for up to 3 days. For longer storage, you can freeze them! Just make sure to separate layers with parchment paper to prevent sticking.
What’s the best way to reheat dumplings?
To reheat, I recommend using a skillet over medium heat. Add a splash of water, cover with a lid, and steam them for a few minutes until heated through. This method helps retain that crispy bottom while making sure they’re warm all the way to the center. You could also pop them in the oven at 350°F (175°C) for about 10-15 minutes if you prefer.
Can I use other proteins or vegetables in the filling?
Absolutely! Feel free to get creative with your fillings. Ground turkey, pork, or even tofu work wonderfully if you’re looking for a different flavor. You can also mix in veggies like mushrooms, bell peppers, or even spinach for a tasty twist. Just make sure to chop everything finely so they fit nicely in the dumpling wrappers.
Can I make the dumplings ahead of time?
You bet! You can assemble the dumplings ahead of time and store them in the fridge for a day or two. If you want to make them even further in advance, freeze the uncooked dumplings. Just lay them out on a baking sheet first to freeze individually, then transfer them to a freezer bag. They can go straight from the freezer to the pan, just add a couple of extra minutes to the cooking time.
What dipping sauces pair well with these dumplings?
The possibilities are endless! A classic soy sauce mixed with a splash of rice vinegar is always a hit. If you want a little kick, try adding chili oil or sriracha. I love mixing soy sauce with a touch of sesame oil and chopped scallions for a fresh and flavorful dip. Get creative and find your favorite combo!
There you have it! I hope these FAQs help you out as you embark on your dumpling-making journey. Enjoy every moment of it, and happy cooking!
Why You’ll Love This Recipe
- Quick and Easy: With just a few simple steps, you can whip up a batch of Crispy Pan-Fried Chicken Dumplings in no time! Perfect for a weeknight dinner or a fun weekend cooking session.
- Flavor Explosion: The savory filling combined with the crispy exterior creates a delightful contrast that will have your taste buds dancing. Each bite is packed with deliciousness!
- Customizable: You can easily adapt the filling to suit your taste. Swap out chicken for your favorite protein or add in extra veggies to make it your own.
- Healthier Option: These dumplings are made with fresh ingredients, allowing you to control what goes into them. You can even make them lighter by using leaner meats or loading up on veggies!
- Perfect for Meal Prep: Make a big batch and freeze them for later! They reheat beautifully, making them a convenient option for busy days.
- Family-Friendly: Everyone will love these dumplings, from kids to adults. They’re fun to eat and a great way to get the whole family involved in the kitchen.
- Great for Entertaining: Impress your friends and family by serving these delicious dumplings at your next gathering. They’re sure to be a hit!
Serving Suggestions for Crispy Pan-Fried Chicken Dumplings
Now that you’ve created these delightful Crispy Pan-Fried Chicken Dumplings, it’s time to think about what to serve alongside them! Trust me, pairing them with the right sides and sauces can elevate your meal to a whole new level. Here are some ideas that I absolutely love!
Dipping Sauces
First off, let’s talk sauces! A classic soy sauce mixed with a splash of rice vinegar is a timeless choice. You could also add a drizzle of sesame oil for a nutty flavor. If you like a bit of heat, don’t hesitate to mix in some chili oil or sriracha. Another favorite of mine is a sweet chili sauce that adds a delicious contrast to the savory dumplings. Feel free to get creative and find your favorite combination!
Fresh Side Salads
A light and refreshing salad makes for a perfect compliment to these crispy dumplings. I love serving them with a simple cucumber and carrot salad dressed with rice vinegar and a sprinkle of sesame seeds. The crunchiness of the salad balances beautifully with the tender dumplings. You could also whip up a quick Asian-inspired slaw with cabbage, green onions, and a sesame dressing for a colorful side that adds a bit of zing!
Steamed Vegetables
Steamed veggies are another great option! Broccoli, bok choy, or snap peas lightly steamed and tossed with a bit of soy sauce or garlic butter make for a lovely accompaniment. They add a nutritious element to your meal and pair perfectly with the flavors of the dumplings.
Rice or Noodles
If you’re looking to make it a heartier meal, serve your dumplings alongside a bowl of fluffy jasmine rice or some stir-fried noodles. The rice can soak up any extra dipping sauce, and the noodles can be tossed with stir-fried vegetables and a splash of soy sauce for a comforting dish that rounds out your meal.
Pickled Vegetables
Lastly, don’t forget about pickled vegetables! A small side of pickled radishes or carrots can enhance the overall dining experience. The tangy crunch adds a delightful contrast to the dumplings and helps cleanse the palate between bites.
Avec ces suggestions de service, vos Crispy Pan-Fried Chicken Dumplings brilleront encore plus sur la table. Enjoy every bite and the wonderful flavors that come together in this delightful meal!
Pour plus de recettes, suivez-moi sur ma page Pinterest.
Print
Crispy Pan-Fried Chicken Dumplings: 7 Joyful Secrets
- Total Time: 41 minutes
- Yield: 9 cookies 1x
- Diet: Vegetarian
Description
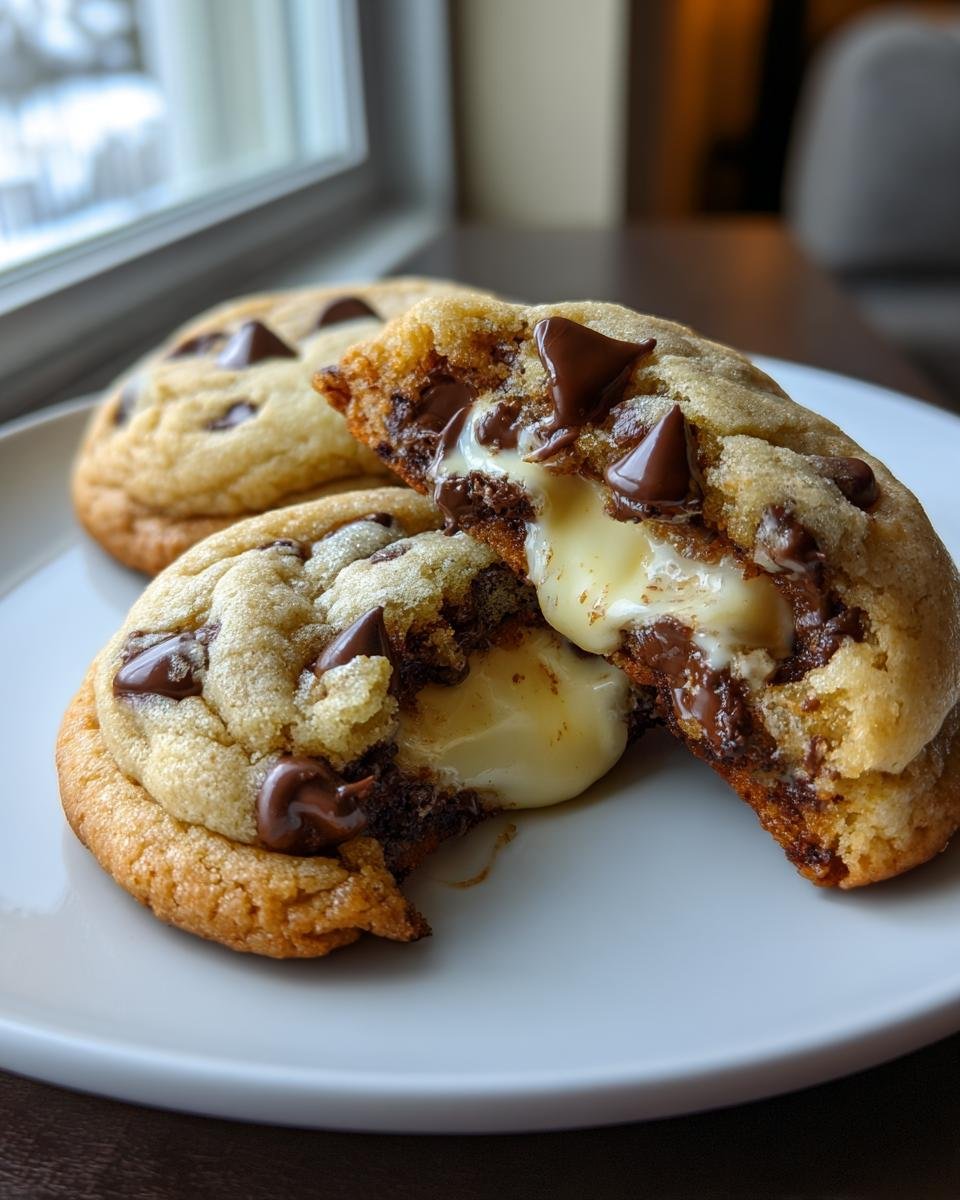
Cheesecake stuffed chocolate chip cookies are a delicious dessert that combines creamy cheesecake with soft chocolate chip cookies.
Ingredients
- Cheesecake Filling:
- 3 oz cream cheese
- 3 tbsp powdered sugar
- Chocolate Chip Cookie Dough:
- 1/2 cup butter, slightly softened
- 1/2 cup brown sugar
- 1/3 cup granulated sugar
- 1 egg
- 1 tsp vanilla extract
- 1 3/4 cup all-purpose flour
- 3 tbsp corn starch
- 1/2 tsp baking soda
- 1/4 tsp salt
- 2/3 cup semi-sweet chocolate chips, plus more for topping
Instructions
- In a small bowl, cream together the cream cheese and powdered sugar until smooth.
- Divide the mixture into 9 small mounds on a parchment-lined plate or baking sheet. Freeze for 15–30 minutes until firm.
- Preheat the oven to 350°F (175°C) and line a baking sheet with parchment paper.
- In a medium bowl, cream together butter, brown sugar, and granulated sugar until smooth.
- Mix in the egg and vanilla extract until fully incorporated.
- Gradually add flour, corn starch, baking soda, and salt, stirring just until combined.
- Fold in the chocolate chips.
- Using a large cookie scoop, portion out cookie dough balls.
- Make a small well in the center of each dough ball and place a cheesecake mound inside.
- Fold the cookie dough over the cheesecake and seal well.
- Place cookies on the prepared baking sheet and bake for 11 minutes.
- Immediately top with extra chocolate chips as desired.
- Cool on the baking sheet for 5 minutes, then transfer to a wire rack to cool completely.
Notes
- Ensure cheesecake filling is frozen before assembling cookies.
- Cookies may look slightly underdone when taken out of the oven.
- Store cookies in an airtight container for freshness.
- Prep Time: 30 minutes
- Cook Time: 11 minutes
- Category: Dessert
- Method: Baking
- Cuisine: American
Nutrition
- Serving Size: 1 cookie
- Calories: 200
- Sugar: 12g
- Sodium: 150mg
- Fat: 10g
- Saturated Fat: 5g
- Unsaturated Fat: 3g
- Trans Fat: 0g
- Carbohydrates: 25g
- Fiber: 1g
- Protein: 3g
- Cholesterol: 25mg
Keywords: Cheesecake stuffed chocolate chip cookies